

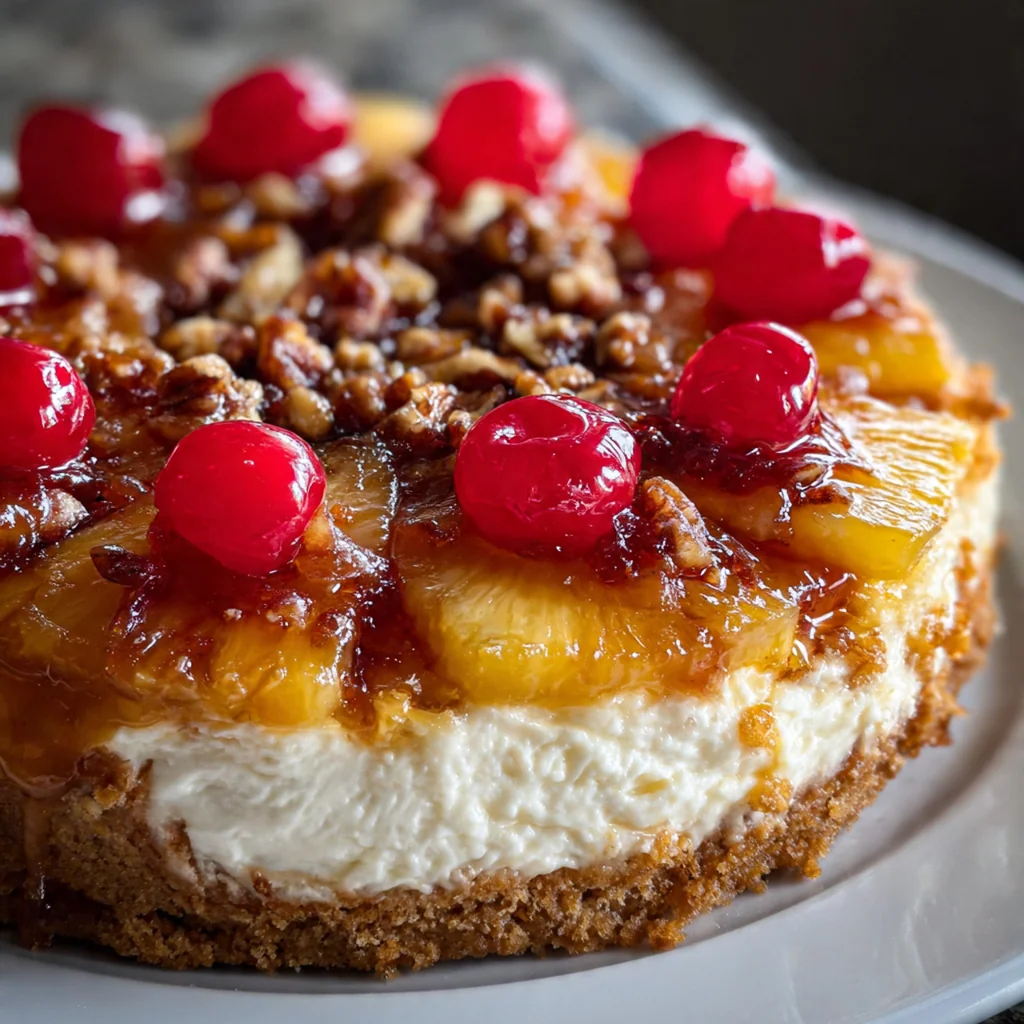
This stunning Pineapple Upside Down Cheesecake is a dessert that feels like pure celebration, merging the nostalgic, sticky-sweet joy of the classic cake with the creamy luxury of a perfect cheesecake. As an American dessert mashup, it’s designed to be the centerpiece of any table. The real magic happens when you flip the pan, revealing a jeweled, caramelized pineapple topping that makes everyone’s eyes light up. It’s the kind of recipe you’ll turn to for birthdays and holidays when you want something truly special.
Why You'll Love This Recipe
- You get two iconic desserts in one spectacular showstopper
- It’s incredibly impressive but secretly simple to put together
- The water bath guarantees a velvety smooth texture without cracks
- The sweet tang of pineapple perfectly cuts through the rich cheesecake
- It’s a make-ahead dream, saving you stress on the day you serve it
Ingredients You’ll Need
- Unsalted butter: The base of your sticky pineapple topping, it melts into the sugar to create that signature caramel flavor and gooey texture. Using unsalted lets you control the overall salt level perfectly.
- Light brown sugar: This is what creates the deep, molasses-kissed caramel sauce. Its moisture helps the sugar dissolve smoothly for a layer that isn’t gritty.
- Canned pineapple slices: They’re already tender and sweet, making them ideal for baking. Choose rings that are packed in juice, not heavy syrup, for the best flavor balance.
- Maraschino cherries: Their bright red color and sweet cherry pop are non-negotiable for the classic look. Make sure they’re well-drained to keep the caramel from getting watery.
- Graham cracker crumbs: They form the crust that holds everything together, offering a toasty, honeyed crunch that pairs wonderfully with the fruit and creamy filling. You can buy them pre-crushed or crush your own.
- Granulated sugar: A little mixed into the crust balances the graham’s slight bitterness, while the bulk of it sweetens the filling smoothly and evenly without adding color.
- Full-fat cream cheese: This is the star of the show, and full-fat is essential for that rich, creamy, and stable texture that won’t weep or crack. Letting it soften is the secret to a lump-free batter.
- Full-fat sour cream: It adds a lovely tang and extra richness that makes the filling impossibly smooth and lush. Like the cream cheese, room temperature is key for seamless blending.
- Pure vanilla extract: It deepens all the other flavors, giving the cheesecake a warm, bakery-quality background note. Always choose pure extract over imitation for the best taste.
- Large eggs: They provide the structure that sets the filling as it bakes. Adding them one at a time on low speed prevents over-aeration, which can cause unsightly cracks.
- All-purpose flour: Just a small amount acts as a stabilizer, helping to bind the filling gently and give it a bit more structure without making it dense.
How to Make It
Preheat and Seal the Pan:
Start by heating your oven to 350°F and securely wrapping your springform pan in two layers of heavy-duty foil. This critical step creates a waterproof seal for the water bath, which is your ticket to a creamy, crack-free cheesecake. You don’t want any water sneaking in and making the crust soggy.
Create the Caramelized Pineapple Layer:
Melt the butter in a saucepan and stir in the brown sugar until it dissolves into a bubbly syrup. Pour this directly into the bottom of your prepared pan. Now, artfully arrange the well-drained pineapple slices and tuck cherries into the centers. This layer becomes the beautiful top after flipping.
Press and Bake the Crust:
Mix the graham crumbs with sugar and melted butter until it feels like damp sand. Press this mixture firmly and evenly over the pineapple layer. A quick ten-minute bake toasts the crust lightly, giving it structure and a deeper flavor. Let it cool a bit while you whip up the filling.
Mix the Cheesecake Filling Smoothly:
Using your mixer on medium-low, beat the softened cream cheese until it’s completely smooth and lump-free. Scrape down the bowl, then beat in the sugar just until combined. Mix in the sour cream and vanilla, then add the eggs one at a time on low speed. Finally, sprinkle in the flour and mix until you no longer see any streaks.
Assemble and Bake in a Water Bath:
Pour the silky filling over your pre-baked crust. Place the springform pan into a larger roasting pan and pour hot water into the roaster until it comes halfway up the cheesecake pan’s sides. This gentle, steamy heat is what bakes the cheesecake evenly without drying it out or causing it to rise and fall dramatically.
Bake, Cool Slowly, and Chill Thoroughly:
Bake until the edges are set but the center still has a slight jiggle. Turn off the oven, crack the door, and let it cool inside for an hour to prevent sudden temperature shock. After it comes out, run a knife around the edge, let it cool completely, then refrigerate it uncovered for at least six hours. Overnight chilling is even better for a perfect, clean slice.
The Grand Flip and Serve:
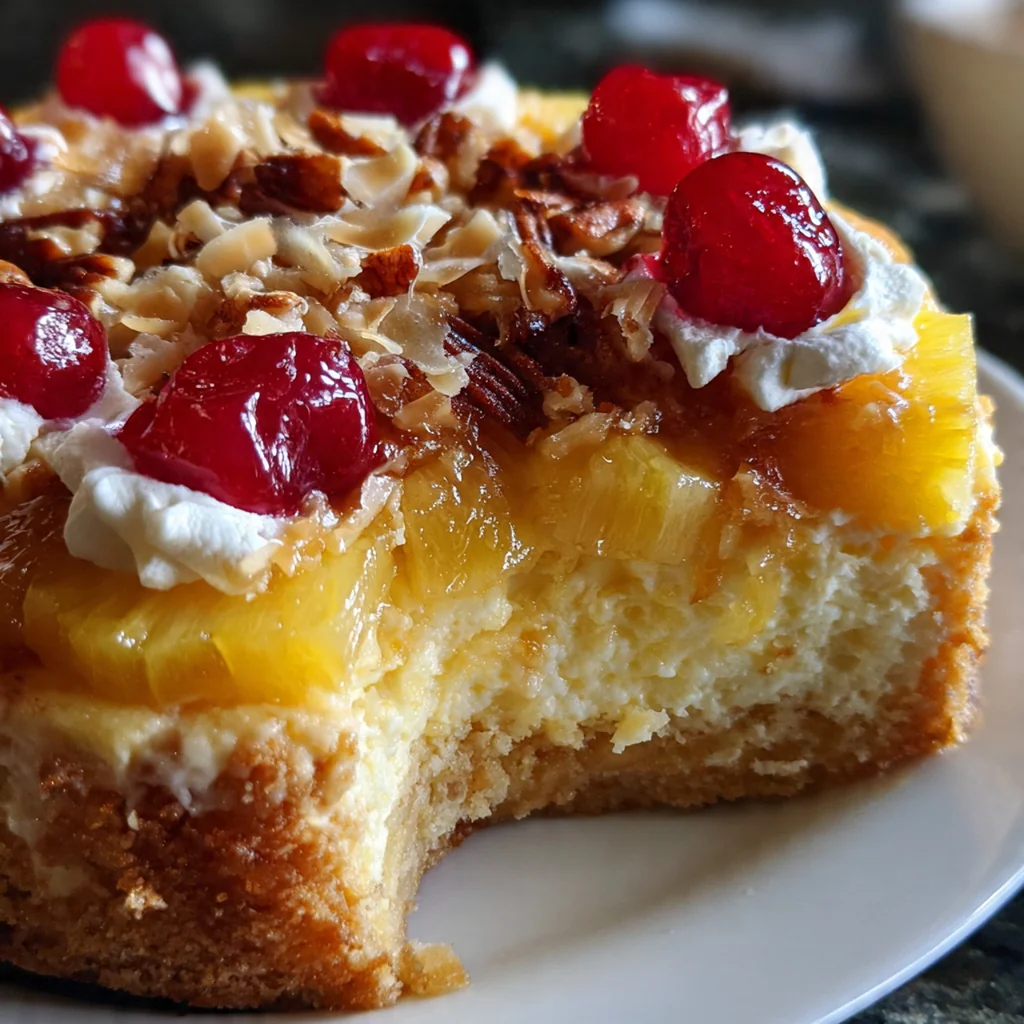
Run your knife around the edge once more to ensure a clean release. Place your serving plate upside-down over the pan, hold them together tightly, and confidently flip the whole assembly over. Gently lift off the pan bottom and sides. If any pineapple sticks, just nudge it back into place with a spatula.
You Must Know
- Room temperature ingredients are the non-negotiable foundation
- Drain the pineapple and cherries extremely well on paper towels
- The water bath is what makes the texture so luxuriously creamy
- Letting it chill overnight is the final step for perfect slices
- That flip moment is pure kitchen magic every single time
Storage Tips
Store any leftover Pineapple Upside Down Cheesecake covered tightly in the fridge, where it will stay fresh and delicious for up to five days. For the absolute best eating experience, let individual slices sit out on the counter for about 15 to 20 minutes before serving. This takes the chill off and allows the flavors and creamy texture to really shine. I never recommend freezing this cheesecake, as the delicate pineapple topping and creamy filling can become watery and lose their perfect texture upon thawing.
Ingredient Substitutions
If you need a gluten-free version, simply swap the graham cracker crumbs for an equal amount of gluten-free graham-style crumbs and use a trusted gluten-free flour blend in place of the all-purpose flour. For the cherries, well-drained jarred morello cherries or even fresh pitted cherries can stand in for maraschino if you prefer a less sweet, more tart fruit note. In a pinch, full-fat Greek yogurt can replace the sour cream, though the final texture will be slightly denser and the tang a bit more pronounced. There’s really no great substitute for the canned pineapple rings here, as fresh pineapple contains an enzyme that prevents the cheesecake from setting properly.
Serving Suggestions
I love serving each slice with a generous dollop of freshly whipped cream or a small scoop of premium vanilla ice cream to complement the warm pineapple flavors. A light drizzle of the reserved pineapple juice or even a caramel sauce over the top adds an extra layer of sweetness and makes it look restaurant-worthy. For beverages, a cup of strong black coffee or a glass of Moscato or late-harvest Riesling balances the richness beautifully. It’s such a complete dessert on its own that you don’t need much else, but a few extra cherries on the side never hurt.
Cultural Context
This Pineapple Upside Down Cheesecake is a brilliant example of American culinary innovation, taking two beloved mid-century classics and fusing them into one unforgettable dessert. The original pineapple upside-down cake soared in popularity in the 1920s after Dole sponsored a recipe contest, while the creamy, decadent New York-style cheesecake became a diner staple. Putting them together is a relatively modern twist that plays on our love for both nostalgia and indulgence. It’s a dessert built for sharing and celebration, perfect for potlucks, holiday tables, and any gathering where you want a treat that sparks joy and conversation.

Pro Tips
- Pat your drained fruit with paper towels until no moisture remains
- Mix the filling on low speed once the eggs go in to avoid air bubbles
- Use a sharp, thin-bladed knife dipped in hot water for pristine slices
- Let the flipped cheesecake sit for 10 minutes before removing the pan bottom
- That overnight chill in the fridge is absolutely worth the wait
Frequently Asked Questions
While canned pineapple slices are recommended for their consistent size and moisture level, you can use fresh. Just be sure to core and slice it very thinly, about 1/4-inch thick, and poach the slices in a simple syrup for a few minutes to soften them and prevent excess juice from making the topping soggy.
Absolutely. This cheesecake is an excellent make-ahead dessert. After baking and cooling completely, refrigerate it overnight. The flavors meld and intensify, and the structure firms up perfectly, making it easier to slice cleanly. Keep it covered in the pan until just before serving.
If you don’t have maraschino cherries, you can use jarred Morello cherries (pitted and well-drained) or fresh pitted cherries that you’ve briefly cooked in a little sugar syrup. The classic red spot is part of the look, so any small, red, sweet cherry will work beautifully.
The cheesecake is done when the edges are set but the center still has a slight jiggle—like Jell-O—when you gently shake the pan. The internal temperature should be about 150°F. It will continue to set as it cools. Overbaking can cause cracks.
This rich cheesecake is perfect on its own. For a classic American diner-style pairing, add a dollop of freshly whipped cream. A light drizzle of the reserved pineapple juice or a scoop of vanilla bean ice cream also complements the caramelized flavors wonderfully.